

Wednesday, December 19, 2018
Tuesday, December 11, 2018
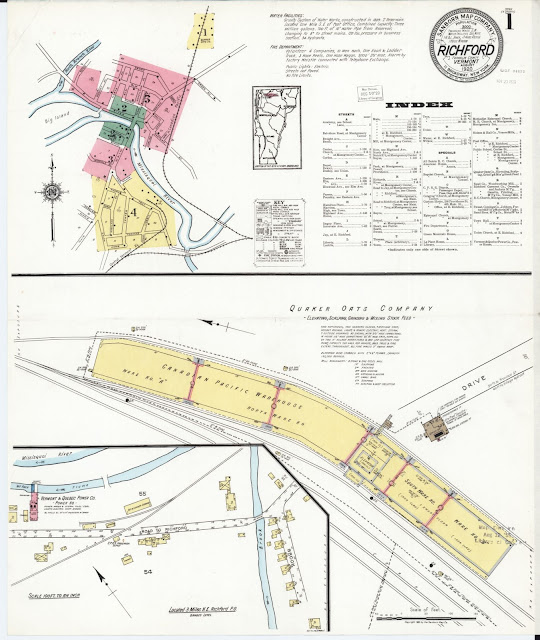
Sanborn Maps - Richford Feed Mill and CV Yard
Most of the last month has been taken up with travel to visit family and friends, but I have gotten started on roadbed and track. One reference I'm using to lay out not only the track, but the various scenic elements such as roads, waterways, buildings, and the like are Sanborn Fire Insurance Maps.
The Library of Congress has been making considerable progress posting scans of the full color original maps and posting them on the LOC website (www.loc.gov).
Here are the maps showing the Richford, Vt. feedmill (top) and the Central Vermont Railway yard. (Click the links or images below to go to the map on the LOC web site).

Wednesday, November 28, 2018

Monday, November 5, 2018
Finescale Expo 2018 Trip Report
 |
| Our "dinner club" at the FineScale Expo. |
Stic Harris and I have attended several of these. We departed early - very early - Friday morning and as has become a tradition the weather for the drive to the Expo was miserable. Stic wasn't familiar with model railroad podcasts so we listened to a couple of episodes of Todd and Brett Wiley's "Benchtime" podcast on the way up to Albany.
The weekend was fairly low key, with an agenda familiar to anyone who's ever attended any model railroad related event. This event is always a little different since the emphasis is most assuredly NOT on "trains" - but instead on structures, scenery, and details. There's a vendor room, clinics (both hands-on extra fare clinics, and "standard" clinics). Those run Thursday through Saturday. Sunday is devoted to self-drive layout tours.
We didn't attend the hands on clinics, but did attend several regular clinics - including one on LED lighting and another where we learned it was important to think like a tree when planning a scene.
 |
| A quick side trip to Lake George prior to visiting Kip Grant. |
Saturday afternoon was bright and sunny so after getting a recommendation from Kip Grant (the closest thing we had to a "local") on the best hobby shops in the area we hit two of them Saturday afternoon. Both were well stocked, but one of them was like a trip to hobby shops of the past, with the shelves stacked high with a variety of new, old, and somewhat shelf worn merchandise and the owners and the local gang solving all the world's problems (model railroad-related and otherwise!) behind the counter.
My plan had been to take pictures of the fall foliage on this trip. The foliage looked great through the rain on Friday. Saturday it also looked great - but most of it was on the ground or swirling around in 40-50 mph wind gusts. Better luck next year.
Sunday morning we left the hotel bright and early and headed north to visit Kip Grant's D&H railroad - which has long been one of my favorites.
 |
Kip (foreground) shows Stic his recessed turnout toggles. This view shows perhaps 2/3rds of Kip's wonderful D&H
branch. Goes to show you
don't need a massive railroad to end up with a great model railroad!
|

 |
| Check out the windows in the elementary school! |


On the way south we stopped in and visited the NEB&W in Troy - and then started back towards Virginia. Although the sheer size and scope of this railroad is impressive, frankly it's looking tired and ragged in sections and in need of a good cleaning. But we still enjoyed our visit there.
All in all, a great weekend with good friends.


Wednesday, October 31, 2018
Room Paint Colors
I've had some inquiries about the paint brand and colors used for the sky and benchwork.
For everyone's reference, mostly mine, they are shown here (click on image or caption to go directly to the Sherwin-Williams web page):
For everyone's reference, mostly mine, they are shown here (click on image or caption to go directly to the Sherwin-Williams web page):
 |
| The room walls above the benchworkare Sherwin Williams #6793 "Bluebell" |
 |
| The walls below the layout, and the legs of the IKEA Ivar units, are Sherwin Williams #6222 "Riverway." (I plan to use this color for the fascia). |
Tuesday, October 23, 2018
Stubby Peninsula
A quick update on progress down in the basement.

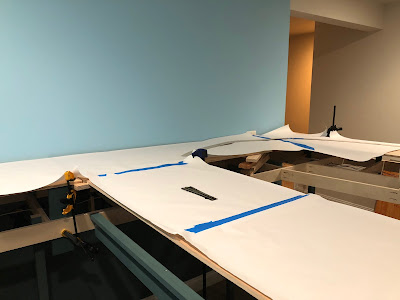
Most of the subroadbed in the "yard" and "town" areas - those sections where the terrain will be basically flat - has been installed. I temporarily propped up plywood in all the areas where the subroadbed will be cut to fit the track and taped large strips of paper to the plywood. I'll arrange flextrack on the paper, trace around it, cut it out and use the result as templates for cutting the plywood to shape.
 As I was positioning the track I realized it might help to have at least the first section of the peninsula in place to ensure the track curving onto the peninsula landed on benchwork and not on the floor. Luckily I'd pre-painted the components for the peninsula so when Stic stopped by the weekend before last we got the first 8 feet or so of the longer peninsula attached. In order to give some additional stability to the peninsula I used an IKEA Ivar cabinet. This will be useful for storing layout construction and scenery supplies - although the bottom shelf of the cabinet will house a couple of (heavy) boxes of magazines.
 Saturday, October 13, 2018
Video Layout Update #2
For those of you interested, I just posted a short (about 7 minute) video update.
This features a quick pan of the layout area, showing the benchwork in its current state and then does some minimum radius testing on both a CV 2-8-0 and, just for fun, a 2-10-4. You can find it at the link here, or by clicking on the photo below.
And if you like the video channel please consider subscribing and leaving a comment!

Wednesday, October 3, 2018

Wednesday, September 26, 2018

Wednesday, September 19, 2018

Monday, September 17, 2018
Progress Report - 17 September 2018
 |
| Progress photo - September 16, 2018. It's starting to look like something other than a pile of wood! |
As I've mentioned before, one of the main goals for this layout (dictated by my wife - although I completely agree with her) is that it should "Look like a piece of art or furniture and blend in with the rest of the space."
We opted NOT to use the curtains under the fascia since decent looking curtains would not only be expensive, but they would actually detract from the non-cluttered look we're going for.
Early tests with black for the IKEA shelf legs and under the layout was far too stark so I deferred to Christine's color sense. She chose a Sherwin Williams color called "Riverway" (SW 6222) for everything under the layout. The shelves are stained a light shade (Pecan) in order to allow them to pop a little.
 |
| Ultimately I plan to use the IKEA shelves in the "entry" aisle shown here for display purposes for some other models and collectibles. But for now they're serving as staging spots for track, roadbed etc... |
 |
| There's one section where the benchwork is 12" wide - IKEA brackets secured to the inside of a 1"x3" "L" and painted to match the wall are more effective than individual legs or shelves. |
 |
| There's no need to have all the benchwork built on the IKEA shelves (which could get pricey). Using the IKEA Ivar shelf system is working out well - as you can seen here, most of the time you can use a short set of Ivar as shown here, and then bridge the gap to the next set of shelves or even a single support leg. |
 |
| A lesson learned from trying to string wire on previous layouts - lay in the buss wires now. ran a pair of buss wires and a second pair of wires (most likely for lighting and the like) around the entire layout now - before the subroadbed was in place. |
.
Sunday, September 9, 2018
"Surround" or "Screened" Staging - Inspiration for CP staging
If you study the track plan in the link above you'll note the Staging and Feed mill, both of which represent the Canadian Pacific "side" of Richford, are somewhat underdeveloped.
At the same time, the Central Vermont Richford branch, which originates in St. Albans, also needs to be factored in (those CV trains will end their run - actually they'll turn - in Richford - but the CV branchline trains need a place to go to/come from.
I toyed with several arrangements - some of which started getting ever more complicated.
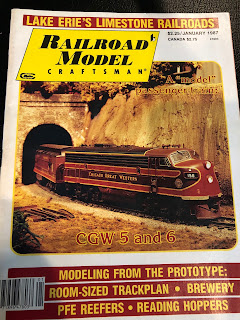 Inspiration for how I'm planning to address all this is coming from an article in, of all places, the January 1987 issue of Railroad Model Craftsman. While I shared several of my early influences HERE, in a post that is among the most read on this blog, I likely didn't encounter the January 1987 issue of RMC until several years after it was published (I was in Navy Main Propulsion school in January 1987 and up to my eyeballs learning the inner workings of ALCo diesels, so I didn't get do any model railroading or rail fanning at the time).
But when I did see this issue one article did make an immediate impression on me. I was on the Model Railroader staff and looking for a design for a layout to fill a spare bedroom when Andy Sperandeo referred me to this article:

This is a Christian Day design for a layout depicting the Grand Trunk's operations in and around South Paris, ME. What was most intriguing about the design was the way he handled the staging. In fact, it was an early version of what has come to be called "Surround Staging" - rather than me typing a long description, a quick study of the track plan makes the concept pretty obvious.
I actually used a slightly modified variant - with the staging tracks placed behind a low 2-D and some 3-D scenery in what I called "screened" staging in a previous layout - so I know the idea works and is quite effective - and is certainly a heck of lot easier than placing staging tracks below the scenicked level on a model railroad.
I suspect if you tried to build Christian's plan in the size room he shows in this piece I think you'd be disappointed at the results. But I know I'm not the only one who's been inspired by the concepts demonstrated on this seemingly simple track plan. Andy once lamented to me that he couldn't get Christian to do any layout design articles for MR!
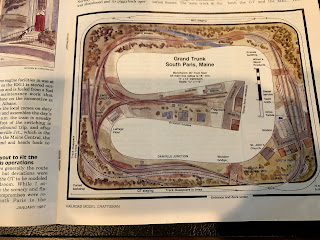 In fact, combine the South Paris Switcher with Andy Sperandeo's San Jacinto branch, a design that was completely misinterpreted as underwhelming at the time it was published, and you have the acorn from which many of today's "achievable" layout designs have sprouted.
I'm going to hold off sharing the specifics of how all this is (hopefully) going to work on the track plan until I have a chance to draw it out to scale.
At the same time, the Central Vermont Richford branch, which originates in St. Albans, also needs to be factored in (those CV trains will end their run - actually they'll turn - in Richford - but the CV branchline trains need a place to go to/come from.
I toyed with several arrangements - some of which started getting ever more complicated.

But when I did see this issue one article did make an immediate impression on me. I was on the Model Railroader staff and looking for a design for a layout to fill a spare bedroom when Andy Sperandeo referred me to this article:

This is a Christian Day design for a layout depicting the Grand Trunk's operations in and around South Paris, ME. What was most intriguing about the design was the way he handled the staging. In fact, it was an early version of what has come to be called "Surround Staging" - rather than me typing a long description, a quick study of the track plan makes the concept pretty obvious.
I actually used a slightly modified variant - with the staging tracks placed behind a low 2-D and some 3-D scenery in what I called "screened" staging in a previous layout - so I know the idea works and is quite effective - and is certainly a heck of lot easier than placing staging tracks below the scenicked level on a model railroad.
 |
| "Screened Staging" on a prior railroad. |
 In fact, combine the South Paris Switcher with Andy Sperandeo's San Jacinto branch, a design that was completely misinterpreted as underwhelming at the time it was published, and you have the acorn from which many of today's "achievable" layout designs have sprouted.
 I'm going to hold off sharing the specifics of how all this is (hopefully) going to work on the track plan until I have a chance to draw it out to scale.
Thursday, September 6, 2018

Wednesday, August 29, 2018
Wordless Wednesday #199

Three of John Paganoni's scratchbuild vans on Paul Dolkos' former B&M layout
Wednesday, August 15, 2018

Monday, August 13, 2018
Making sawdust


Since that area will be where two wood trestles are located, I needed to lower the base height slightly so it worked out well.
If pressed I will claim that I planned it that way....
 While the vast majority of the benchwork will be open grid as show here, since the Richford peninsula is kinda oddly shaped I'm going to use L-girder there since it will be easier to create a more "free-form" look than the myriad of angle cuts that would required for open grid.
 One thing I'm doing on this layout (lesson learned from last one!) is using pocket screws to make it easier to move the cross members when/if that proves necessary. I'm trying to avoid having access to any screws prevented by the screw ending up against the wall or buried behind scenery or behind the fascia where it would be very difficult to access.
Wednesday, August 8, 2018

Tuesday, August 7, 2018
Something I need to get back to...

One of the things I intended to work on during this "between layout (and house!) time" was the artwork for some Central Vermont lettering - especially things like the flatcars and MofW cars.
Of course I transferred the Illustrator file that I'd started working on several years ago to the hard drive.
Great, except that I neglected to remember that I didn't have Illustrator loaded on the laptop.
The screen capture above serves as a reminder that I'd like to get back to this project.
First I have find all the bits and pieces on this machine!
Thursday, August 2, 2018


Resin Freight Car Cleanup tips
If your summer has been as wet as ours has been perhaps you were Googling "ark building" when you stumbled across this blog.
In the interest of providing something useful on this blog I'll go ahead and offer a few tidbits on preparing resin kits. That's a perfect task for the summer modeling season.
These are bits and pieces of a planned eBook on building and detailing rolling stock. While I still hope to finish that book - someday - in the meantime here's a couple of things from the cutting room floor.

Cleaning up the parts
No matter the manufacturer, I start by cleaning the parts before assembly, and then follow up with a pre-painting touch up cleaning.
Different manufacturers use different mold releases - some of them are really hard to clean off completely - and you won't realize it's still there until you try to paint the model and the paint either beads up or comes off in sheets. Sylvan mold release seems to be the toughest.
I've tried warm soapy water, Goo Gone, Sylvan resin prep (which I'm pretty sure is some form of Goo gone), but one thing I've found always works pretty well is Shout. After removing the resin sheets from the tissue paper wrapping I gave each of the parts a shot of "Shout" (yes, the laundry stain pre-treat stuff) and scrub them gently with a toothbrush before rinsing them under warm water. Then I put the parts aside to dry.
A few tools
I don't use a lot of fancy tools to build these kits, mostly a razor blade, an X-acto, some sanding sticks/files, pliers (to form wire), tweezers, a small machinists square, and starting in the last few years, an Opti-visor....
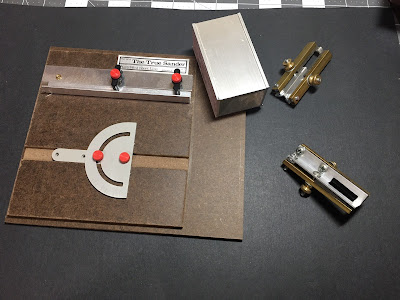 For drilling holes for grabs and brake components and the like, I prefer my drill press - but an old fashioned (but perfectly serviceable) pin vise works just as well. Two tools that I find are really useful are shown in the photo to the right:
The NWSL True-Sander
Coffman right corner clamps
Removing flash
The most tedious part of building a resin freight car is cleaning up the parts.
 But time and care spent on this task definitely shows on the finished model. Despite what the instructions say, I don't clean off all the parts before I start constructing the model. For one thing, I'd run out of enthusiasm before getting started, and for another I'd likely lose half the parts before getting everything together!
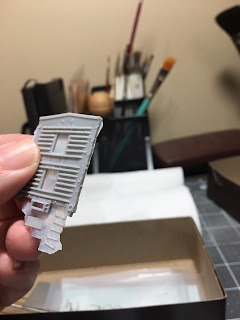
 If there's a trick to removing the flash it's to be careful to not accidentally remove any detail that should be there. On flat kits it's quite common to find the sides or ends have some detail that needs to be preserved. A perfect example are the rivets on the side of the ends of this car - you might be tempted to sand the edge flat on your NWSL Tru-Sander - but you'd be removing the rivets and other details. The trick is to remove the flash without destroying the detail in the process. For this, I use a razor blade held at a steep angle to scrape away the resin flash. I've found it's sometimes better to use a slightly dull razor blade for this scraping technique. A sharp, fresh blade can sometimes slice right into the resin whereas a dull blade will meet with just enough resistance that you can avoid digging into the part.
 To remove flash from openings, such as the end of this ventilated boxcar, I use a hobby knife and trim the resin flash to the edges, then use sanding sticks and/or files to true up the openings.
In the interest of providing something useful on this blog I'll go ahead and offer a few tidbits on preparing resin kits. That's a perfect task for the summer modeling season.
These are bits and pieces of a planned eBook on building and detailing rolling stock. While I still hope to finish that book - someday - in the meantime here's a couple of things from the cutting room floor.

Cleaning up the parts
No matter the manufacturer, I start by cleaning the parts before assembly, and then follow up with a pre-painting touch up cleaning.
Different manufacturers use different mold releases - some of them are really hard to clean off completely - and you won't realize it's still there until you try to paint the model and the paint either beads up or comes off in sheets. Sylvan mold release seems to be the toughest.
I've tried warm soapy water, Goo Gone, Sylvan resin prep (which I'm pretty sure is some form of Goo gone), but one thing I've found always works pretty well is Shout. After removing the resin sheets from the tissue paper wrapping I gave each of the parts a shot of "Shout" (yes, the laundry stain pre-treat stuff) and scrub them gently with a toothbrush before rinsing them under warm water. Then I put the parts aside to dry.
A few tools
I don't use a lot of fancy tools to build these kits, mostly a razor blade, an X-acto, some sanding sticks/files, pliers (to form wire), tweezers, a small machinists square, and starting in the last few years, an Opti-visor....

The NWSL True-Sander
Coffman right corner clamps
Removing flash
 But time and care spent on this task definitely shows on the finished model. Despite what the instructions say, I don't clean off all the parts before I start constructing the model. For one thing, I'd run out of enthusiasm before getting started, and for another I'd likely lose half the parts before getting everything together!
 If there's a trick to removing the flash it's to be careful to not accidentally remove any detail that should be there. On flat kits it's quite common to find the sides or ends have some detail that needs to be preserved. A perfect example are the rivets on the side of the ends of this car - you might be tempted to sand the edge flat on your NWSL Tru-Sander - but you'd be removing the rivets and other details. The trick is to remove the flash without destroying the detail in the process. For this, I use a razor blade held at a steep angle to scrape away the resin flash. I've found it's sometimes better to use a slightly dull razor blade for this scraping technique. A sharp, fresh blade can sometimes slice right into the resin whereas a dull blade will meet with just enough resistance that you can avoid digging into the part.
  To remove flash from openings, such as the end of this ventilated boxcar, I use a hobby knife and trim the resin flash to the edges, then use sanding sticks and/or files to true up the openings.
Subscribe to:
Posts (Atom)